

Most student and early career architectural designs fail for one reason: weak site understanding. You may create a strong concept, but if you ignore wind, sun path, or soil, your design breaks down during critique. In practice, it may get rejected or cause long-term issues after construction.
Experienced architects use site analysis to guide every decision, from orientation to materials to user comfort. It is not a formality. It is the base of good architecture.
This guide shows you how to perform architectural site analysis step by step so you can approach any project with clarity and confidence.
What is Architectural Site Analysis?
Architectural site analysis is the structured study of a site’s physical, environmental, legal, and cultural conditions prior to design. It helps you make clear design decisions based on real site data.
You study topography, soil, vegetation, drainage, climate, sun path, wind, rainfall, and temperature. You review nearby buildings, roads, movement patterns, and views. You also check zoning laws, setbacks, and height limits.
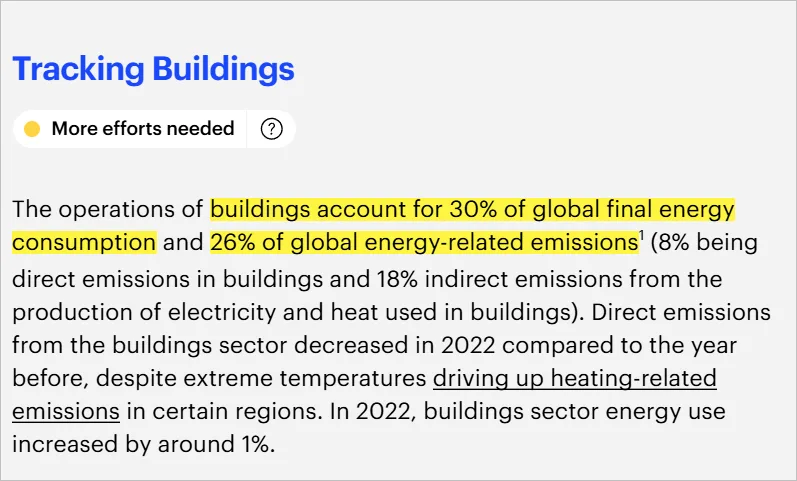
This process matters because buildings use about 30% of global energy and create about 26% of energy-related emissions, as reported by the International Energy Agency. Good site analysis supports passive design through smart orientation, natural ventilation, and climate response.
The goal is simple: turn site data into design action.
If summer winds mainly come from the southwest, you place openings to allow cross ventilation. If the west sun is strong and direct, you add shading or reduce windows on that side. Site analysis helps you convert climate data into clear design decisions.
Here are the steps to perform architectural site analysis
Here is how professionals approach it and how you should approach it too:
Step 1: Understanding the Site Context at Macro and Micro Level
Start by studying the site at two scales. At the macro level, examine the city or regional context. Identify the climate zone, major transportation routes, neighborhood character, and nearby development patterns. This gives you the larger framework that shapes design expectations.
At the micro level, focus on the immediate surroundings. Document adjacent buildings and their heights, as these affect daylight and privacy. Note trees, water bodies, and open spaces. Identify pedestrian and vehicle access points. Observe noise sources and air quality at different times of the day. The micro context directly influences building orientation, entry placement, and spatial organization.
Step 2: Climate Study: The Backbone of Site Analysis
The climate study is the most critical part of site analysis. It determines whether your building will remain comfortable naturally or depend on mechanical systems. Your climate study should include:
- Sun Path Analysis: Map the sun position throughout the day and across seasons. This guides window placement, shading needs, and solar gain control. In winter, allow sun penetration for warmth. In summer, design shading to prevent overheating. Tools like Ladybug Tools and Climate Consultant help generate accurate data.
- Wind Analysis: Study wind direction, speed, and seasonal variation using wind rose diagrams. This informs ventilation strategies and building orientation. In hot humid climates such as coastal regions of India, capturing prevailing winds improves comfort. In colder regions, you may need protection from winter winds.
- Temperature and Humidity: Record average, maximum, and minimum temperatures across the year. High humidity requires different design strategies than dry climates. Materials respond differently and comfort conditions change.
- Rainfall Patterns: Understand rainfall levels and seasonal patterns. This affects roof design, drainage systems, waterproofing, and material selection. A site in Cherrapunji needs different solutions than one in Rajasthan.
Step 3: Topography, Soil, and Natural Features
Topography study means understanding how the land actually behaves. When you map contours and slopes, you see how the site rises and falls. A sloped site can help you create split level spaces, improve natural drainage, and design more dynamic interiors. But very steep slopes raise construction costs and demand proper erosion control.
Soil testing tells you how strong the ground is and how it reacts to moisture. Each soil type needs a suitable foundation. Rocky land may need blasting. Clay soil can hold water and cause settlement, so it often needs special waterproofing. Black cotton soil, found in parts of Maharashtra and Karnataka, expands and shrinks with moisture, so it requires specific foundation treatment.
You should also record existing trees, water bodies, and natural drainage lines. For example, the Delhi Preservation of Trees Act requires official approval before cutting trees above a certain size. Water bodies can increase humidity and raise flood risk. Natural drainage paths should be preserved or carefully included in your landscape plan.
Step 4: Legal and Regulatory Constraints
Before starting design sketches, understand legal limits. This step prevents costly redesigns and rejected approvals. Zoning regulations define land use, building height limits, floor area ratio, and ground coverage. Setback rules define minimum distance from property boundaries.
In India, development control rules vary by city. Mumbai follows regulations under the Municipal Corporation of Greater Mumbai. Delhi follows norms set by the Delhi Development Authority. Bangalore follows its Revised Master Plan. The National Building Code of India sets baseline standards for fire safety, structure, and accessibility. Heritage zones may impose additional limits on height, facade treatment, and materials.
Step 5: Access, Circulation, and Infrastructure
Study how people and vehicles reach the site. Identify primary and secondary roads, their widths, and traffic volume at different times. Note public transport stops, pedestrian paths, and cycling routes. The main entry should allow safe and convenient access while following local authority requirements for driveway location and turning radius.
Map existing infrastructure such as water supply lines, sewage connections, electrical substations, and telecom networks. Confirm whether the power grid can support your building load. Some areas face transformer capacity limits that affect feasibility. In certain locations, you may need on site water storage, rainwater harvesting systems, or sewage treatment plants.
Step 6: Views, Noise, and Sensory Analysis
Evaluate site views carefully. Identify desirable views such as parks, water bodies, or urban landmarks. Also note undesirable views such as industrial areas or blank walls. Place key spaces toward positive views and screen negative ones through layout and facade strategy.
Conduct a noise survey at different times of day. Traffic, religious activity, schools, or commercial areas may affect comfort. High noise zones may require acoustic barriers, double glazed windows, or service spaces as buffers.
Also assess smell and air quality. Sites near industrial zones, markets, or waste facilities require careful ventilation planning and window placement. These sensory factors directly affect occupant wellbeing and property value.
Step 7: Documenting and Presenting Your Analysis
Raw data has little value if not presented clearly. Organize findings into layered diagrams that show information in a structured way. Use consistent symbols, clear legends, and proper scale. Your site analysis should guide the reader logically toward your design decisions.
Strong presentations connect findings with responses. If you identify harsh west sun, show your shading strategy. If you map noise zones, show how your layout responds. This clear link between analysis and design distinguishes professional practice from academic work.
In our Site Analysis and Climate Study masterclass, we teach you exactly how to create professional site analysis sheets that impress juries and clients. You learn observation techniques, sketch formats, and checklists used by working architects. Join the next batch to learn all these steps in a hands-on, practical manner.
Common Mistakes Students and Young Architects Make in Site Analysis
Here are the most common architecture site analysis mistakes and how to avoid them:
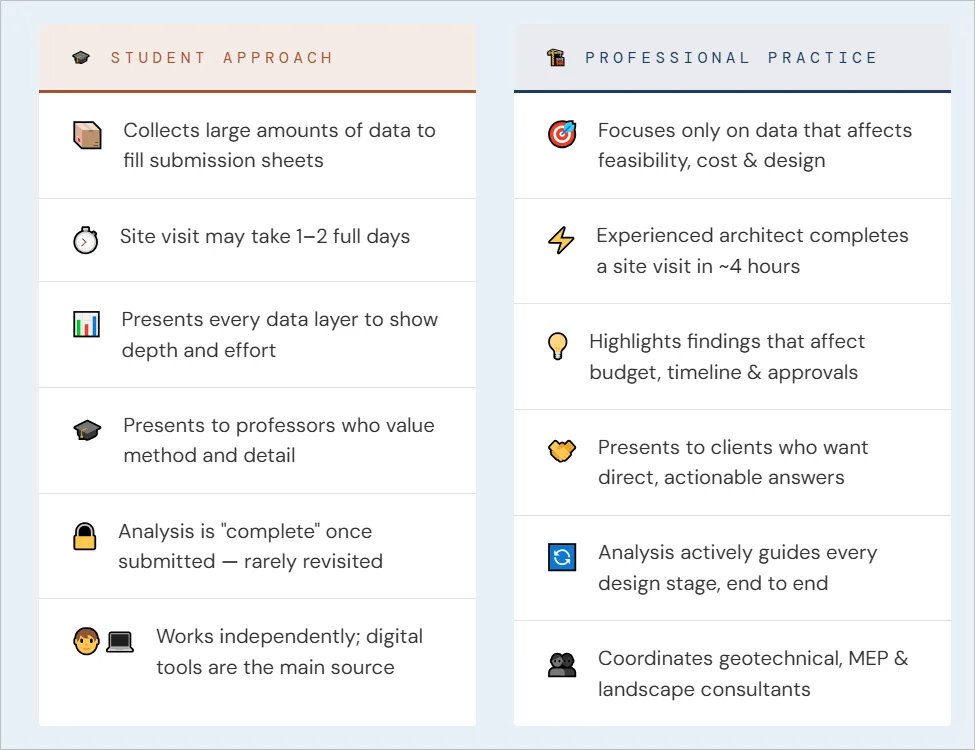
Overloading Drawings with Irrelevant Data
The biggest mistake is showing too much information without purpose. Your site analysis may include wind direction, sun paths, traffic counts, vegetation, landmarks, and history on one crowded sheet. If you do not use that information to guide design decisions, it becomes decoration.
Follow this rule. If you show wind direction, your design must respond to it. If you show sun angles, your facade must reflect that study. Every piece of data should lead to a design action. Otherwise, you are just completing a formality, and review panels can notice this.
Missing Climate Interpretation
Many students collect climate data but fail to explain it. They paste temperature charts and wind rose diagrams from weather websites without stating what those numbers mean for the building. Showing that summer temperatures reach 38°C in Ahmedabad has no value unless you explain how it shapes shading, thermal mass, and ventilation decisions.
Interpretation turns data into insight. Always link climate facts to design impact. If the site receives strong west sun for six hours in summer, explain how you would reduce or protect west openings.
Treating Site Analysis as a Submission Requirement Only
In many architecture schools, students treat site analysis as an early task to complete before starting design. They finish it once and move on. This is a major mistake.
Site analysis should guide every design stage. When shaping the floor plan, check sun angles. When placing windows, review wind data. When selecting materials, consider climate conditions. The analysis should remain active throughout the project, not sit unused in your presentation.
Relying Only on Digital Tools
Google Maps and satellite images help, but they cannot replace a physical visit. You understand noise, air quality, neighborhood character, small climate variations, and pedestrian movement only when you visit the site.
Visit at different times of day and, if possible, in different seasons. A quiet Sunday morning may turn into heavy traffic on Monday. A pleasant winter site may feel extremely hot in summer. Digital tools support field study. They do not replace it.
Lack of Real World Applicability
Many site studies remain academic exercises without practical conclusions. Students record constraints but do not show how the design responds to them.
Professional architects think about construction from the start. They consider how site findings affect foundation systems, facade design, HVAC planning, and cost. If you want your site analysis to earn respect from review panels or clients, show practical thinking and clear design responses, not just collected data.
This is exactly what we focus on in our site analysis masterclass—connecting analysis to real-world design and execution decisions.
How Architects Handle Site Analysis in Real Projects
| Aspect | What Architects Actually Do |
| Time Efficient Workflow | Use a ready checklist. Visit the site with clear goals. Record only data that affects design, cost, or approvals. Complete focused visits within a few hours. |
| Consultant Coordination | Collect soil report from structural consultant. Confirm service load with MEP team. Review landscape inputs. Integrate all reports before freezing concept design. |
| Client Presentation | Summarize key constraints. Highlight buildable area, height limits, risks, and cost impact. Present clear options instead of raw data sheets. |
| Software Use | Model site in Autodesk Revit. Run sun and daylight studies using Ladybug Tools or Autodesk Insight. Use results to refine orientation and facade. |
| Legal Verification | Check zoning map and FAR limits. Confirm setbacks with the authority. Review the latest amendments. At the end, document compliance before starting detailed drawings. |
At ASDAV, our Master Site Analysis and Climate Study masterclass teaches you these skills the way professionals use them. In just 2 hours, you learn practical techniques for analyzing topography, reading climate data, documenting site conditions, and presenting findings that support your design decisions.
Whether you are preparing for thesis submissions, building your architecture portfolio, or transitioning into professional practice, this masterclass gives you the edge. Seats are limited.
👉 Enroll now and start mastering site analysis the professional way.
FAQs
Why is site analysis important in architecture?
Site analysis gives you the facts you need before you design. When you understand sun path, wind, soil, and legal limits, you make clear and logical decisions. Without this knowledge, design becomes guesswork. Good site analysis improves thermal comfort, lowers running costs, and helps the building fit its surroundings. It also reduces errors during approvals and construction.
How is site analysis taught differently in practice compared to architecture colleges?
In colleges, students often collect large amounts of data because it is required for submission. Not all of it shapes the design.
In practice, architects focus only on information that affects feasibility, cost, and client goals. They use clear checklists, consultant reports, and simple presentations. Time and clarity matter more than volume of data.
What is climate study in architectural site analysis?
Climate study means understanding local weather conditions. You examine sun movement, wind direction, temperature range, humidity, and rainfall. This helps you decide on building orientation, window placement, shading, ventilation, and materials. A strong climate study reduces dependence on mechanical cooling and heating systems.
How can I learn site analysis and climate study practically?
You learn best by applying concepts to real projects. Structured training that focuses on observation, documentation, and climate interpretation helps you build confidence. Look for sessions that include case studies, exercises, and practical templates so you can use the knowledge directly in your studio or professional work.For example, ASDAV’s Master Site Analysis and Climate Study masterclass provides a 2-hour intensive session covering observation techniques, documentation methods, and climate interpretation skills used by practicing architects. The masterclass includes case studies, practical exercises, and templates you can apply immediately to your projects. It costs just ₹499 and includes a certificate of participation.
Jasmine Ahluwalia is a Licensed Architect, Interior designer, Global Vastu consultant and the founder of ASDAV.
She is a graduate of Scuola Master F.lli Pesenti, Politecnico di Milano, and brings strong global exposure through academic learning and professional design projects. Her background combines architecture, interior design, and applied design education.
Before founding ASDAV, Jasmine worked as an assistant professor at Amity School of Architecture and Planning, Amity University Noida. Her research covers sustainable architecture, urban heat island reduction, and circular economy practices in construction. Her work has been published in Scopus indexed and peer reviewed journals as well. She also has strong international on-site experience from countries like Canada, Mauritius, UK, and many more.
Through ASDAV, she has trained more than 500 students across 25 cities. The ASDAV platform has 12+ instructors from IIT, SPA, CEPT and NID , and has delivered over 200 live learning sessions. Her mission is to bridge the gap between design education and real industry expectations, to deliver real growth for her students.
She designs spaces for a living, but her favourite project is designing careers.